
Printed overlays play integral roles in the form and function of most devices ranging from industrial equipment to typical consumer electronics. This is a comprehensive tutorial that delves into the realm of printed overlays with explicit information on their category, advantages, and limitations. You could either be a production expert who would like to simplify your product designs or a curious buyer who would like to discover the technology in your products, but this guide will provide you with the knowledge to make informed choices about printed overlays.
1. What Are Printed Overlays?
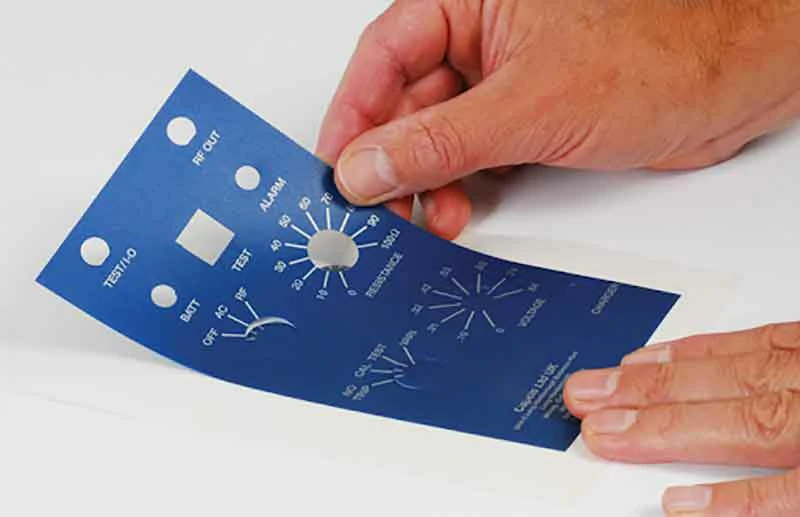
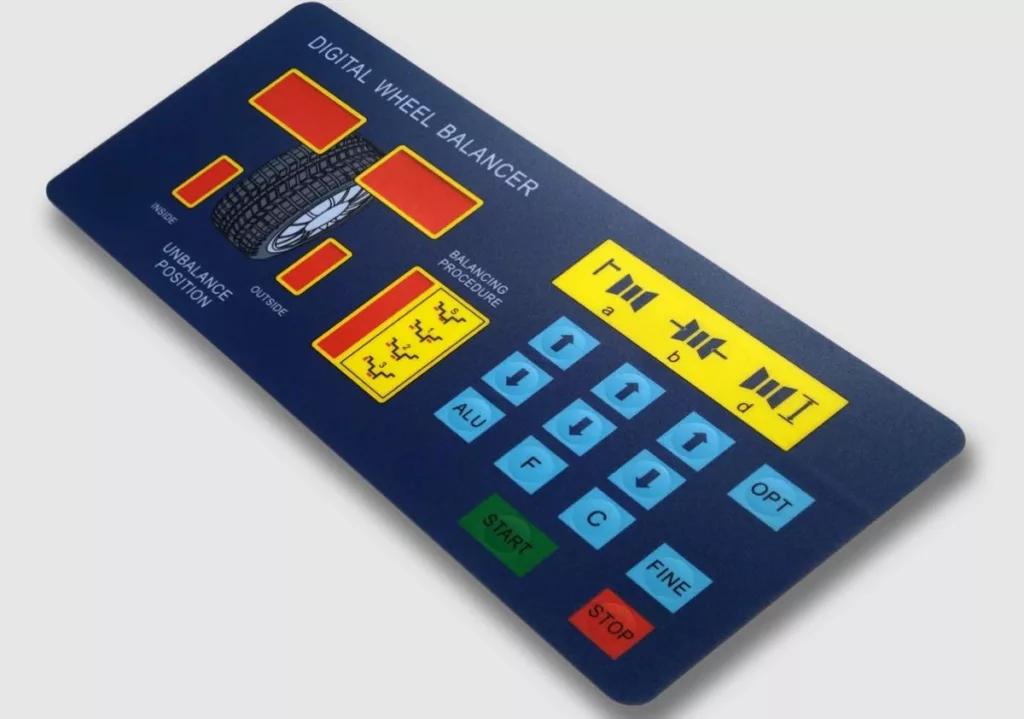
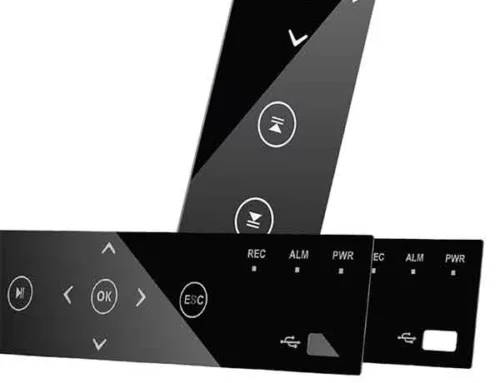
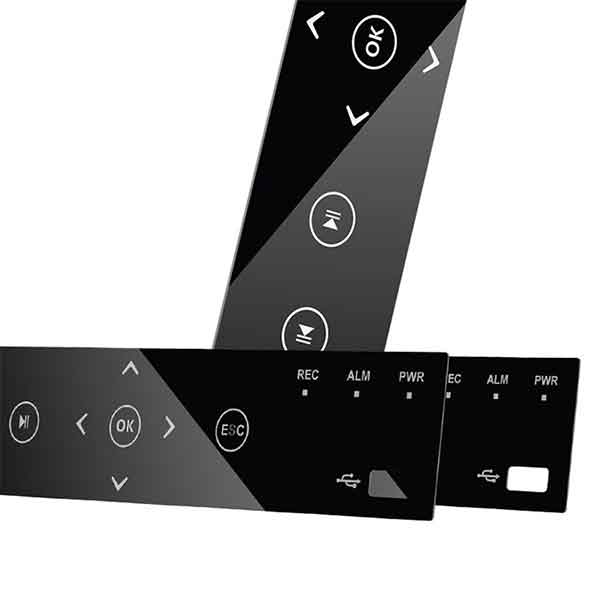
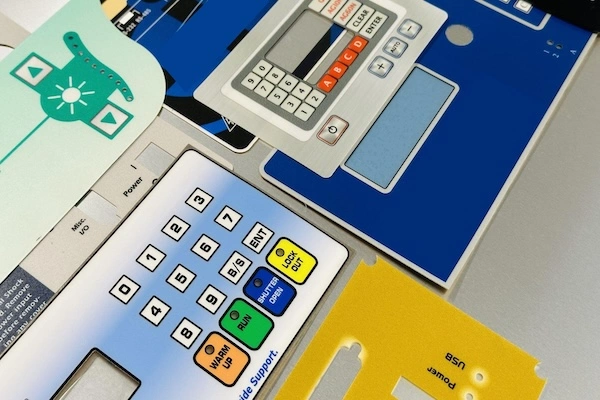
Printed overlays consist of thin, durable fragments of material, most often polycarbonate or polyester, printed with graphic components like symbols, text, and color. The graphic components serve to show information, instruction, or brand to the user. Printed overlays will typically constitute the top surface of a membrane switch assembly or other electronic assembly and provide a nice-looking and usable interface at the same time protecting the bottom circuitry from outside dangers.
Fabrication of printed overlays involves the use of various printing technologies such as screen printing, digital printing, and laser etching. These technologies enable high-resolution graphics, high details, and even functional elements such as backlighting or capacitive touch functionality. Anything but cosmetic improvement, printed overlays are among the necessary components that contribute to the overall durability, usability, and functionality of electronic devices.

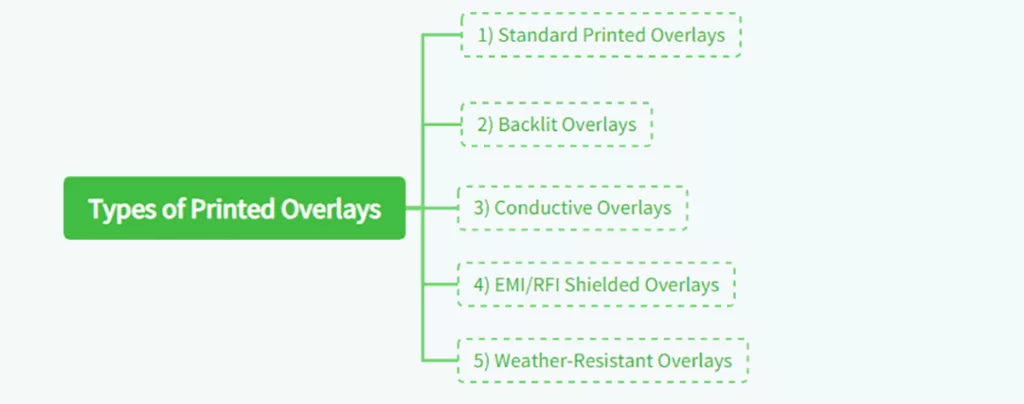
2. Types of Printed Overlays
Printed overlays exist in various forms, each being used for specific applications, environments, and users. The overlay depends on the operating environment of the device, the user interface to be presented, and the level of durability required. The following are the most common forms of printed overlays, their characteristic features, and uses.
1) Standard Printed Overlays
Standard printed overlays are the most basic form of overlays, featuring simple graphics, text, and symbols. These overlays are typically used in gadgets where user interaction must be intuitive but where features like backlighting or touch sensitivity are unwanted. Normal overlays are usually found on household appliances, consumer electronics, and basic industrial devices.
Although they don’t have advanced features, basic printed overlays have a number of advantages in cost-effectiveness and flexibility for alteration. They are simple to produce and in mass, and as such, a good choice for consumer products in large quantities.
2) Backlit Overlays
Backlit overlays are designed to be illuminated at the back side, usually LEDs, to gain improved visibility during low-light surroundings. Overlays are usually deployed in car dashboard, aerospace control panels, and other devices, which are regularly used in low-light environments. The backlighting apart from enhanced visibility also enhances an aesthetic purpose, so the device becomes eyes-friendly.
Backlit overlays entail a unique design consideration regarding the material to be used since the overlay must allow light to pass through some areas and not others. This is generally achieved by printing opaque and translucent layers in patterns. Backlit overlays are generally more expensive than regular overlays since the production process and design are more intricate.
3) Conductive Overlays
Conductive overlays are blended with conductive materials such as indium tin oxide (ITO) or silver ink to enable capacitive touch functionality. Overlays are used in touch screens, advanced control panels, and interactive displays. Conductive elements make the overlay detect touch input, and it is translated into the device’s commands.
Conductive overlay design is more complex than the design of standard overlays, as very precise alignment of the conductive layers onto the underlying circuitry is required. In addition, conductive overlay materials must be strong and flexible so that repeated touch inputs can be supported without degradation over time.
4) EMI/RFI Shielded Overlays
Electromagnetc interference (EMI) and radio-frequency interference (RFI) have the capability to negatively impact the operation of electronic devices, particularly sensitive ones like high-frequency communication devices, medical devices, and military devices. EMI/RFI shielded overlays attempt to overcome such adverse effects by the presence of shielding material in the form of metal meshes or conductive coating in the overlay.
These overlays form a barrier that excludes outside electromagnetic fields from interfering with the device’s function. In addition to shielding, EMI/RFI shielded overlays have to meet the same aesthetic and functional requirements as any other overlay, making it a more difficult design issue.
5) Weather-Resistant Overlays
Weather-resistant overlays are designed particularly to satisfy demanding environmental conditions, i.e., harsh temperatures, wetness, UV, and chemicals. Such overlays have their most basic use in outdoor kiosks, maritime, and weather monitoring equipment where usage is always all about maximum durability and dependability.
These overlay materials that are weather-resistant, e.g., UV-stabilized polycarbonate or polyester, are chosen on the grounds of how well they can withstand degradation. Overlays are also typically fitted with special coatings that provide added moisture, chemical, and abrasion protection.
3. Choosing the Right Materials for Printed Overlays
With printed overlays, the material you choose influences far more than the appearance of your product. It influences its feel, longevity, and resistance to stress. We’ll take you through the most critical performance considerations, skim over the most widely used materials compared, and present some useful guidance on how to choose the optimum one for your project.
1) Key Material Performance Indicators
Each material used on printed overlays reacts in a specific way to light, temperature, or mechanical load. Understanding these basic properties helps you make sensible design choices:
| Property | What It Means | Why It Matters |
| Light Transmission | The percentage of light that passes through a material. | High transparency ensures clear visibility for displays or indicator windows. |
| Tensile Strength | The ability to resist pulling or tearing forces. | Determines how well the overlay withstands bending, pressing, and repeated use. |
| Thermal Resistance | The stability of a material at high or low temperatures. | Essential for products used in extreme or fluctuating temperatures. |
| Chemical Resistance | Resistance to oils, cleaning agents, and solvents. | Prevents discoloration or surface damage in industrial or medical environments. |
| UV Resistance | Protection against yellowing and degradation under sunlight. | Vital for outdoor or high-exposure equipment. |
| Surface Hardness | The ability to resist scratches and wear. | Keeps printed graphics clear and professional-looking over time. |
| Dimensional Stability | How much a material expands or contracts with temperature and humidity. | Ensures consistent alignment between printed patterns and underlying components. |
2) Comparing Common Materials
Below is a side-by-side list of the most frequently used overlay materials, the positives and negatives associated with them, and where they work best in real application.
| Material | Advantages | Limitations | Typical Applications |
| Polycarbonate (PC) | Excellent clarity and impact resistance, easy to thermoform and emboss, smooth surface for vivid printing. | Sensitive to chemicals and solvents, may yellow under long UV exposure. | Medical devices, consumer electronics, indoor control panels. |
| Polyester (PET) | Outstanding chemical and abrasion resistance, stable dimensions, supports hard coating for extra durability. | Less formable, not ideal for deep embossing or curved surfaces. | Industrial controls, outdoor electronics, automotive dashboards. |
| PVC (Polyvinyl Chloride) | Cost-effective, easy to print, flexible, and available in many finishes. | Poor UV resistance and limited lifespan in harsh environments. | Temporary or promotional panels, low-cost devices. |
| PC+PET Composite Films | Combines PC’s clarity with PET’s durability, suitable for multi-layer builds such as backlit or touch overlays. | Higher cost, complex lamination process, adhesive compatibility must be tested. | Premium equipment, illuminated panels, advanced user interfaces. |
3) How to Choose the Right Material?
Choosing the right material starts with knowing your environment, function, and manufacturing requirements. Here’s how to get it down to a choice:
1. Match the environment
- For indoor usage, PC would typically be the choice due to its transparency and easy processing.
- For chemical-intensive or outdoor conditions, PET is more resistant and less susceptible to damage.
- For high-temperature usage, PET surpasses PC in heat resistance.
- For low-temperature or impact-intensive conditions, PC’s impact resistance renders it a better choice.
2. Consider display and appearance needs
- Use optical-grade PC or PET for transparent windows.
- Use matte or anti-glare PET for readability under bright lighting.
- For high-intensity, high-color images, PC delivers stronger ink adhesion and print sharpness.
3. Think about manufacturing compatibility
- If your design includes embossed buttons or curves, PC is easier to shape.
- When precision alignment and stability are critical, PET performs better.
- For designs that include touch sensors or backlighting, composite films provide the best balance.
4. Balance cost and durability
- PVC fits short-term or disposable products where budget matters most.
- PC and PET offer the best value for mid to long-term industrial use.
- Composite films are the premium option for sophisticated, multi-functional applications.
Well-designed material will enhance the longevity of your product and general performance. At the beginning of the design process, it is a good idea to sit down with your overlay supplier and discuss your use environment, durability requirements, and appearance goals. Ordering small test samples or pilot lots offers the chance to check for clarity, adhesion, and resistance before expanding to production.
4. How Printed Overlays Are Designed?
Creating an overlay for print is a precise process that marries the rigor of engineering with the emotion of human design. It’s designing an as-beautiful-as-the-eye surface that feels intuitive and trustworthy with each use. From shape and texture to light and alignment, every aspect contributes to how individuals interact with a product.
1. Structure, Function, and Layout Design
A successful design begins with understanding its purpose. Is the overlay protecting internal parts, a user interface, or a cosmetic layer? Once the designer has decided the purpose, the designer makes a layout to decide where each button, window, or symbol is placed.
Good structure means that functions are grouped logically and that every visual element supports usability. Alignment with internal components such as switches, displays, or indicator lights is essential to ensure the final overlay fits perfectly and performs as expected.
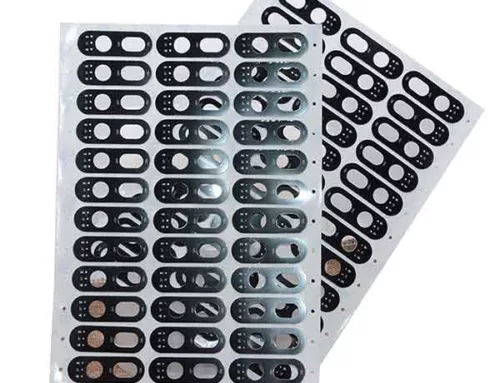
2. Openings, Windows, and Cutting Details
Every opening in a printed overlay needs to be precise. Holes for buttons, LED indicators, and display windows must align exactly with the hardware underneath. Designers plan the shape and edges carefully so that the overlay seats cleanly during assembly.
For products that require unique forms, custom cutting or curved edges can make the device look more refined. Proper design also leaves small tolerances to prevent peeling or distortion caused by heat, humidity, or frequent use.
3. Embossing and Tactile Feedback
When a key is pressed by a user, that brief moment of feedback generates confidence in the product. Embossing provides every key with its own distinct feel by elevating or curving the surface. Pillows, rims, or domes are the most popular shapes, with each offering a distinct touch feeling.
The size and shape of the embossing are varied depending on the desired firmness or softness of the key.
4. Backlighting and Light Distribution
Light can transform a standard overlay into a high-end interface. Backlight designs rely on high transparency and diffusion to provide even light that will be attractive visually.
The designers typically employ light-guiding layers or diffusing patterns to spread the light of the LEDs uniformly over the surface. Opaque areas block unnecessary light, keeping icons and symbols clearly defined. When done properly, the lighting not only adds functionality but also sophistication to the look.
5. Integration with Display, Touch, and PCB Modules
New devices will combine overlays into display panels, touchscreens, and printed circuit boards. All these parts must be in a suitable alignment when stacked on top of one another. The overlay material must also be compatible in transparency and adhesion with the underlying layers so that the display may be clear and touch-sensitive.
Correct integration also prevents issues such as glare, reflection, or failure of bonding. In some designs, there are very few ventilation paths or micro-spacers that prevent the overlay from being rough and containing trapped air.
6. Usability and Ergonomic Considerations
Great overlay design is not only about looks or alignment but also about how easily users can interact with it. Buttons have to be in the natural direction of hand movement and be of suitable size. The readability of color contrast and legible symbols enables users to locate functions instantly, even in low levels of light.
Grouping controls by function or priority results in a natural flow, and this lessens the possibility of committing a mistake. The design aims to keep every action simple and intuitive so that users can utilize them easily and in confidence.
Designing an overlay to be printed is art and science. It needs to have technical accuracy, material knowledge, and insight into people who will use it. If all these are combined, the result is something that looks professional, feels good, and functions properly with daily use.
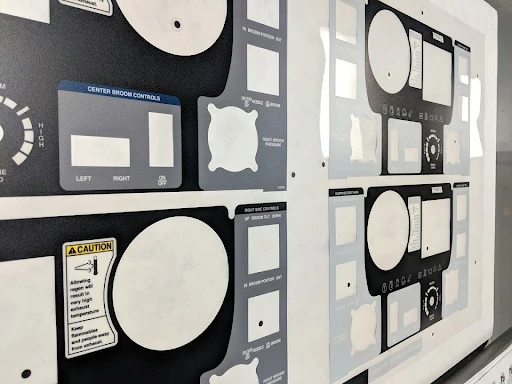
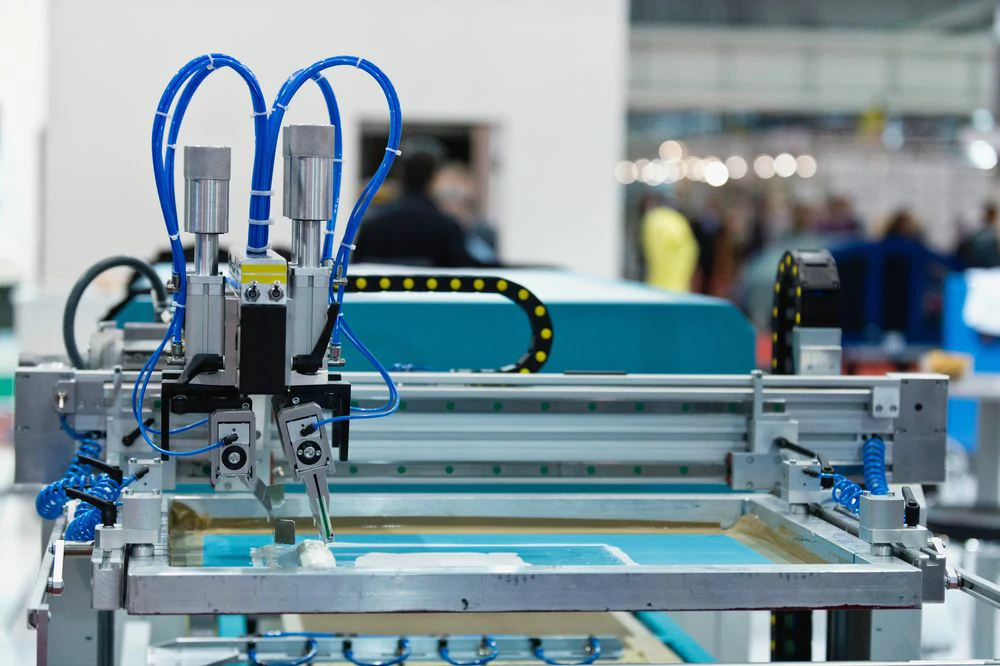
5. From Design to Production: How Printed Overlays Are Made
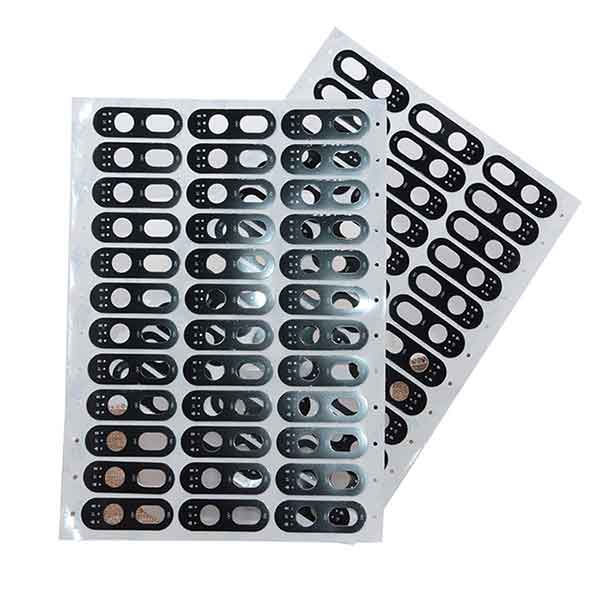
Once the design is finalized, production processing transforms digital concepts into physical overlays to exact specification. It normally begins with conditioning the material of selection, either polycarbonate or polyester film, and thoroughly cleaning it to remove all dust and oils. The graphics are thereafter printed, usually by screen printing or digital printing, based on how much precision and color intensity is desired. Each layer of ink is cured and inspected for even color and adhesion. For backlighting elements, transparent or diffusing areas are printed separately to achieve even illumination.
After printing, the material moves on to cutting, lamination, and finishing procedures. Adhesive coatings are applied on the back, and if required, the film is embossed for raised buttons or tactile points. Precise cutting ensures that every window and contour fits perfectly with the device it will be guarding. Finally, every overlay is inspected for clarity, alignment, and durability before packaging to ship. The ultimate result is a safe, high-quality surface that combines durability, functionality, and look in one continuous layer.
Design → Print → Cure → Laminate → Cut → Inspect → Pack
6. Advantages of Printed Overlays
There are numerous advantages of printed overlays that contribute to them being inseparable components of modern electronic gadgets. The advantages extend beyond utility and incorporate shielding properties that complement the efficiency and longevity of the device further.
1) Enhanced Durability
Another advantage of printed overlays is that they are resilient. Constructed from tough materials such as polycarbonate or polyester, these overlays protect the contents below from environmental elements such as moisture, dust, chemicals, and physical tension. This protective layer extends the lifespan of the device, reducing the need for frequent repairs or replacements.
For industrial and outdoor applications, where equipment has to withstand hostile environments, overlay durability in print is particularly important.
2) Aesthetic Versatility
Print overlays offer excellent degrees of aesthetic flexibility, whereby any degree of customization is possible in graphics, color, and texture. This is ideally suited to be applied in devices where user interface design and branding are concerned. Utilizing high-definition printing technology offers the capacity for producing detailed designs, symbols, and logos that will bring a professional appearance to the device and the branding requirements.
Beyond visual appeal, printed overlays could also include tactile features like embossed buttons or textured regions, which serve to further contribute to user experience.
3) Enhanced User Experience
The clear, simple designs of printed overlays form a significant component of the overall user experience. By providing symbols, text, and graphical objects with simple interpretation, overlays allow users to operate the device more rapidly and with greater confidence. This is particularly applicable in usage situations where user error would have severe consequences, e.g., in medical devices or industrial control panels.
Aside from their graphical legibility, printed labels can also facilitate tactile enhancement in the form of raised buttons or touch areas. The tactile elements provide users with haptic cues, allowing for easier navigation of the device interface without total abandonment of visual feedback.
4) Low-Cost Customization
As compared to mechanical assemblies, printed overlays offer a less costly means for customizing device interfaces. The simplicity and quickness of revising the graphics, text, or structure of an overlay enable modification of the device to satisfy changing user requirements or branding needs without expensive retooling.
This cost-effectiveness is particularly beneficial in the product design-driven industries whose products are constantly updated or where multiple variants of the device are being produced for a multiplicity of markets.
5) Easy Integration
Printed overlays are designed to fit seamlessly into device assemblies such that initial production process as well as post-production maintenance processes are simplified. The adhesive backing of the majority of overlays renders them easy to affix to the device surface, and their flexible, thin design guarantees that they won’t compromise the overall form factor of the device.
Apart from being easy to install, printed overlays may also be easily replaced in case they are damaged or worn out with time. This is thus a convenient choice for devices that are meant to be upgraded or serviced regularly.
6) Chemical Resistance
High-quality printed overlays are designed to be particularly resistant to a wide range of chemicals and are thus well-suited for use in demanding industrial applications. The chemical resistance offered by such overlays is that the overlay will not be damaged or deteriorated by exposure to cleaning agents, solvents, or other corrosive substances.
For applications in which chemical exposure is an issue, e.g., medical implants or industrial devices, chemical resistance of printed overlays is a consideration of great significance to the device’s long-term reliability.

7. Drawbacks of Printed Overlays
While printed overlays boast many advantages, they do also have some disadvantages that must be considered when the proper overlay to use in an application is determined.
1) Limited Repair Options
When a printed overlay is so damaged that it cannot be repaired, it will have to be replaced. It may be very costly, particularly in applications where the overlay suffers repeated wear and tear. While replacement is easy, ongoing replacement can become added cost in the overall maintenance of the device.
2) Design Complexity
Custom-overlay printed design entails careful consideration of various factors, including material selection, printing technology, and the requirements of user interface. This kind of complexity can make the design process quite long, particularly for overlays with complex features like backlighting or capacitive touch capabilities.
In addition to technical needs, printed overlay designs must also meet appearance needs, i.e., color integrity and branding needs. Achieving the best compromise between appearance and functionality may be challenging and a trial-and-error process.
3) Wear and Tear
Over time, overlays printed may disintegrate, particularly where touched often like on touch-sensitive areas or buttons. Disintegration may occur in either form or functionality of the overlay and as fading graphics, edge peeling, or reduced touch sensitivity.
Although ideal materials and print processes can be used to mitigate such conditions, frequent maintenance and replacement could be necessary to ensure the overlay continues to be useful and visually engaging.
4) Environmental Constraints
While the majority of printed overlays are weather-resistant, extreme environmental conditions can still reduce their performance and shelf life. As an example, exposure to UV light for an extended period can render some overlays brittle or yellowed, and high heat can break down the adhesive backing or stretch the overlay.
Proper choice of an overlay designed for conditions found in a very hostile environment is a condition of their employment in such conditions. Protective arrangements can in certain circumstances need to encompass additional protection above an overlay chosen and applied appropriately.
8. Failure and Rework Case Analysis
Even with ideal materials and state-of-the-art printing techniques, printed overlays will periodically fail in real use. Understanding why the failure occurs and how to prevent it is a critical component of continuous improvement. By examining a few common examples, designers and engineers can strengthen subsequent designs and avoid rework costs.
1. Typical Failure and Rework Examples
he most prevalent issue is ink delamination wherein printed graphics peel or deteriorate over time. It generally occurs in overlays exposed to cleaning agents or the elements in the absence of protection from UV.
A second common failure is an adhesive separation, generating bubbles, edge lift, or total removal from the surface. There are cases of overlays losing tactile definition because of shallow embossing depth or overheating during curing. All these defects can shatter usability and affect a product’s professional appearance.
2. Root Cause Diagnosis
Most overlay problems can be traced to one of four main locations: design, material, process, or installation.
- Design defects typically consist of improper spacing between windows or buttons, low color contrast, or lack of protection for high-wear areas.
- Material mismatches occur when adhesives utilized are not compatible with the device surface or when non-UV stable films are utilized outdoors.
- Process defects consist of incorrect curing temperature, faulty ink thickness variation, or contamination of printing and lamination.
- Installation mistakes such as applying overlays to unclean or oily surfaces also lead to poor adhesion and early peeling.
- Systematic analysis of these conditions helps identify which step went wrong and what needs to be fixed before production resumes.
3. Corrective Actions and Prevention Strategies
To cure existing issues, suppliers will re-laminate and re-print overlays with better adhesion systems or protective coatings. More importantly, preventative measures must be built in at every stage of manufacturing.
- At design, factor in environmental and chemical exposure issues in material selection.
- At printing, employ controlled humidity and cleanliness to prevent ink defects.
- At assembly, clean surfaces thoroughly and align them before applying.
- Before shipment, perform environmental simulation testing such as temperature cycling and UV exposure to support long-term endurance.
These actions stabilize the process and minimize the potential for failures in the field significantly.
4. Lessons from Successful Projects
On the other hand, successful projects share several commonalities. Design is validated through initial samples, and every component—material, ink, and adhesive—is checked for compatibility before mass production. There exists effective collaboration between design and manufacturing personnel during the project to avoid any potential risk at an early stage.
Successful overlays depend on good-quality materials with protective coatings, clear process parameter records, and strict quality control before boxing. They are proof that carefulness in planning and testing leads to reproducible, long-lasting results.
Failures are not defeats but learning opportunities. Each case is a valuable source of information about how printed overlays behave under real use. Through analyzing what failed and comparing it with what worked, designers and engineers can continually refine their methodology, doing better and pleasing customers more in the long term.
9. Printed overlays Cost Structure Analysis
Understanding the cost structure for printed overlays assists both purchasers and designers in making better-informed choices. Each finished overlay represents multiple value-creation stages, from material and print to labor and quality control. Knowing what contributes most to the total cost allows teams to reconcile performance and price more effectively.
1) Main Cost Components
The total cost of a printed overlay can be subdivided into numerous primary components:
Material Costs: The majority of the cost usually comes from the base film, adhesives, and coatings. The type of use, be it polycarbonate, polyester, or composite materials, dictates the cost directly. Specialty coatings such as anti-glare or UV-resistant coatings contribute to the cost also.
Printing and Processing Costs: Screen printing, digital printing, and curing each has different amounts of setup, precision, and ink usage. Detailed artwork with numerous colors or backlight regions require more time to print and consume more material.
Labor and Equipment Costs: Skilled technicians are needed to operate printing equipment, register the layers, and check quality. Equipment calibration and servicing are part of the recurring production costs.
Tooling and Cutting Costs: Special dies, embossing dies, and cutting dies have to be designed for specific shapes or buttons. For large orders, the tools are divided into many pieces, but for small production runs, they can greatly add to unit cost.
Quality Inspection and Waste Management: Systematic inspection ensures that each overlay meets visual and functional specifications. Rejects or reprints for defects such as misalignment or ink smear contribute to waste costs. Effective processes reduce scrap and save time.
Packaging and Logistics: Protection of packaging, labeling, and shipping are the final cost considerations. Transportation and customs processing for overseas shipments need to be included when evaluating the total cost as well.
2) How Design Affects Cost
Early in a project, design decisions will have a great impact on the overall cost. An uncomplicated design with fewer colors, fewer opening for die-cutting, and standard sizes will be less costly to manufacture. Too tight tolerances or complexly shaped dies add to setup time and raise scrap rates.
Choosing the proper materials for the application also avoids early failures that will result in rework expenses down the line. Such as spending a little extra on UV-resistant films for exterior applications that will pay out over the life of the product through less replacements and service calls.
3) Practical Cost Optimization Tips
Work ahead with the manufacturer to examine your design for simplifications possible without sacrificing function or aesthetic. Standardize dimensions wherever possible to enable reuse of available tools and dies. Order in lots to take advantage of volume discounts, since larger runs decrease unit prices.
Test samples before going into mass production to prevent waste due to design errors. Monitor yield rate and fix recurring defects in a timely manner to reduce rework costs.
10. Common Questions Checklist When Working with a Printed overlays Manufacturer or Factory
Working with the right manufacturer is perhaps the most important part of producing high-quality printed overlays. Open communication ensures that your design intent is properly translated into production output. Before you begin, it’s helpful to have a set of questions that guide your conversations and prevent expensive misunderstandings later on.
1. Design and Material Confirmation
- Does the factory provide material samples or data sheets for the adhesives and films they use?
- Are the materials to be suggested appropriate for my own environment such as outdoor, high heat, or chemical exposure?
- What are the types of surface finishes that they can provide, for instance, matte, glossy, or textured?
- How is their color matching capability, and if they offer Pantone or custom color systems?
- Are they able to accommodate special features such as embossing, transparent windows, or backlighting areas?
2. Printing and Process Capability
- What kind of printing procedures are they providing, and which one will suit my design best?
- What is their largest print size or panel dimension?
- Do they cure and print in-house or outsource any of these processes?
- How do they control alignment between printed layers, adhesives, and cutting outlines?
- What quality control methods are in place during each stage of production?
3. Tooling, Cutting, and Assembly
- Are cutting dies, molds, or embossing tools produced in-house or by third parties?
- What is the tolerance for cutting accuracy and hole alignment?
- How is lamination handled to prevent bubbles or surface defects?
- Can the manufacturer support small-batch prototyping before full-scale production?
- What are the lead times for tooling and sample approval?
4. Testing, Inspection, and Certification
- What kinds of tests are conducted to verify durability, chemical resistance, and UV stability?
- Are there standard quality reports or inspection certificates provided with shipments?
- Can they simulate environmental stress such as heat, humidity, or vibration?
- How do they ensure traceability of materials and production batches?
- Are their processes compliant with international standards such as ISO or RoHS?
5. Pricing, Lead Time, and Logistics
- How is pricing structured, and what factors most influence the cost per unit?
- What is the typical production lead time from order confirmation to delivery?
- Are there minimum order quantities for each material or color type?
- How are shipping, packaging, and labeling handled?
- Can they assist with export documentation and customs clearance if needed?
6. After-Sales and Support
- What is the procedure if defects or performance issues are found after delivery?
- Do they offer design review or engineering feedback before mass production?
- Can they store molds or dies for future repeat orders?
- Is there a dedicated contact person for technical communication and order updates?
- How do they handle product revisions or reorders with design changes?
Having a well-prepared checklist ensures that both sides understand the technical details, expectations, and workflow from the very beginning. It builds trust and reduces risk throughout the collaboration. A good manufacturer not only answers these questions confidently but also provides guidance that helps you improve your design and production efficiency.
11. Conclusion
Printed overlays are a key component of modern electronic device design, and the only method by which a device can be functional, durable, and also good-looking. In consumer electronics to aerospace, printed overlays provide sharp user interfaces, protect underlying components, and assist in giving the entire user experience a boost. With the knowledge of a number of overlays, and also their strengths and weaknesses, you can ensure that your devices will continue to work properly and look very amazing years later.
Whether you are creating a new device or maintaining an existing one in good working order, printed overlays offer a cost-effective and convenient means of enhancing both the usability and appearance of your device. With this comprehensive guide, you are now better equipped to make sound choices about printed overlays so your devices are up to the best performance and usability standards.


This guide provided me with an in-depth understanding of how printed overlays function and their significance within electronic interfaces. The explanations were clear yet technical enough for professionals. I highly recommend it for product designers or manufacturers.