
Acrylic front panels are a common feature in most industries due to their appearance, durability, and flexibility. No matter if you intend to utilize them for a cutting-edge display, interior design, or any other application, there is a need to understand everything there is to learn about all the variables prior to making a decision.This authoritative compendium is intended to take you by the hand into the ins and outs of acrylic front panels, handling the most ubiquitous questions raised and providing thorough material on their essence, maintenance, and applications.
1. What are Acrylic Front Panels?
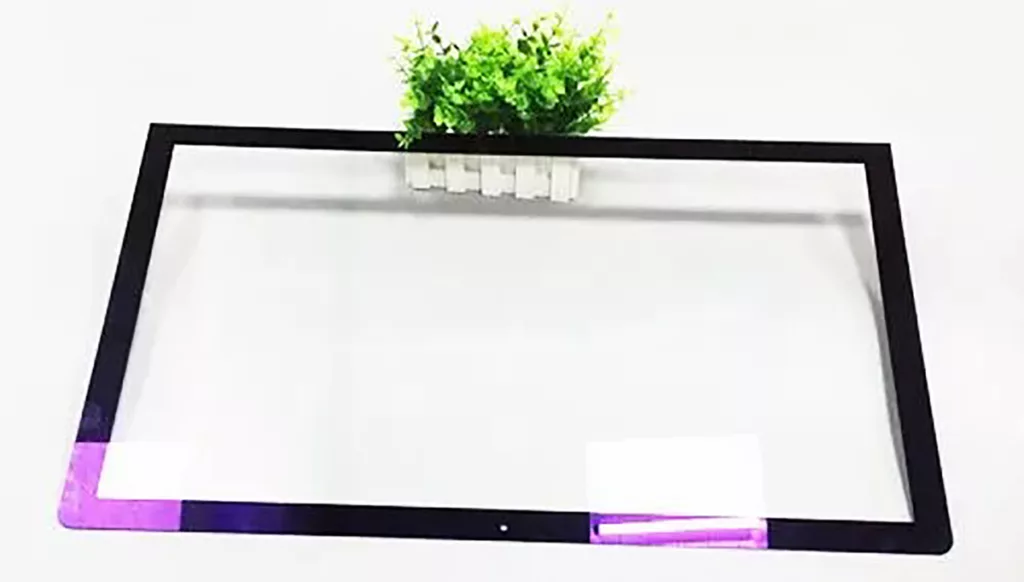
Acrylic front panels or acrylic faceplates are volume-produced components made of acrylic products, primarily polymethyl methacrylate (PMMA). The panels are highly in demand because they have very high clarity, high impact, and very light weight. Acrylic front panels tend to be generally more desired over glass because of their shatter resistance and light transmission superiority, making it an extensively utilized commodity from consumer electronics to architecture.
2. Types of Acrylic Front Panels
Acrylic front panels come in several types, all intended for specific applications. Some of the most common types are:
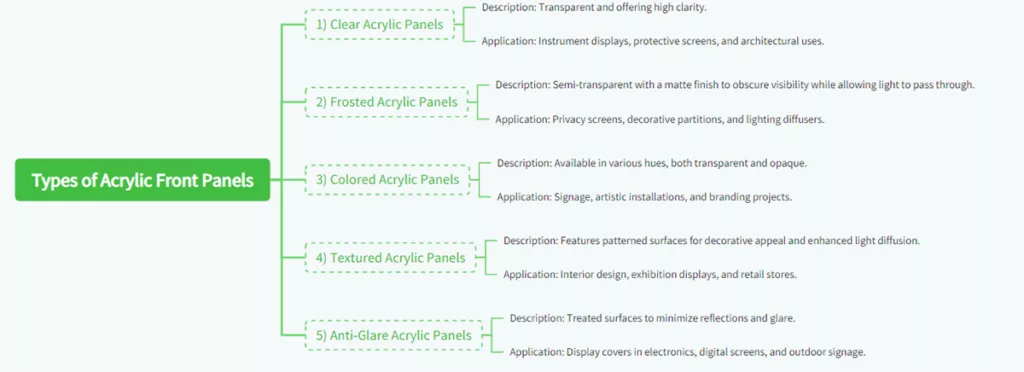
1) Clear Acrylic Panels
Description: Transparent and offering high clarity.
Application: Instrument displays, protective screens, and architectural uses.
2) Frosted Acrylic Panels
Description: Translucent but with a matte or non-glare finish for concealing observation but allowing penetration by light.
Application: Decorative screening, partitioning, and light diffusing illumination.
3) Colored Acrylic Panels
Description: Provides several colors that are both translucent and opaque.
Application: Branded signs, installations, and design work.
4) Textured Acrylic Panels
Description: Features patterned surfaces for decorative appeal and enhanced light diffusion.
Application: Interior design, exhibition displays, and retail stores.
5) Anti-Glare Acrylic Panels
Description: Treated surfaces to minimize reflections and glare.
Application: Display covers in electronics, digital screens, and outdoor signage.
3. Advantages of Acrylic Front Panels
There are numerous benefits of acrylic front panels that render them ideal for various applications:
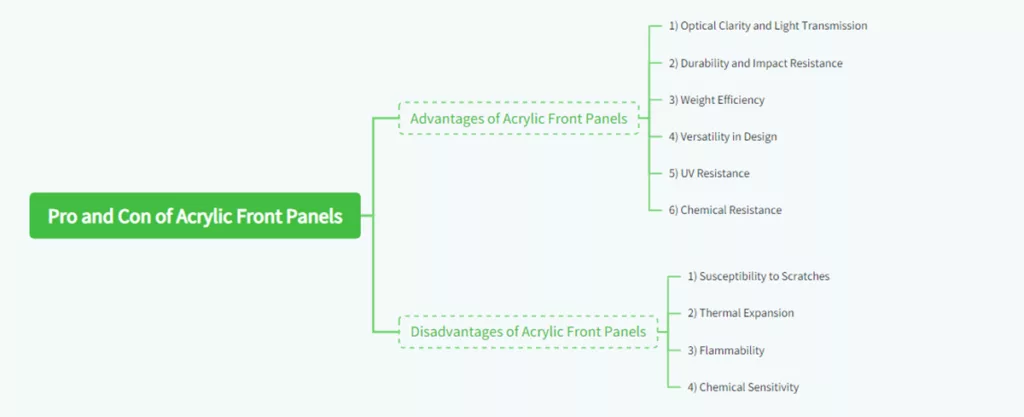
1) Optical Clarity and Light Transmission
Acrylic panels offer greater clarity, allowing up to 92% light transmission, and are thus most ideally suited for application where crystal clear vision is critical.
2) Durability and Impact Resistance
Light and very robust, acrylic panels are as much as ten times less probable to be dented by an impact than glass and deliver long-term safety and performance that is resilient.
3) Weight Efficiency
Acrylic panels are lighter and easier to manufacture, manipulate, ship, and install, which saves labor and shipping costs.
4) Versatility in Design
They are merely cut, drilled, shaped, and pigmented to certain design specifications and hence offer immense versatility in creative designs.
5) UV Resistance
A few of the acrylic variants are treated for resistance to UV degradation and hence may be utilized outdoors without any concern for eventual yellowing or brittleness.
6) Chemical Resistance
Acrylic is resistant to most chemicals and thus offers long-term durability where there is regular exposure to chemicals.
4. Ads of Acrylic Front Panels
Despite their numerous advantages, acrylic front panels have some drawbacks that you should consider:
1) Susceptibility to Scratches
Acrylic panels, though resistant, may scuff and scratch and require careful treatment and care. Anti-scatter coatings may be applied but would add cost.
2) Thermal Expansion
Acrylics will expand and contract with temperature change, which may require special care during installation in applications of severe change in temperature.
3) Flammability
Acrylic is more flammable than glass, so it may not be suitable where there is a high need for fire resistance. Flame retardant varieties exist but have to be specified by use.
4) Chemical Sensitivity
Although acrylic resists the majority of chemicals, it may be attacked by certain solvents and adhesives, and it may be required that compatible material is utilized in close proximity to the panels.
5. Processing & Manufacturing Techniques for Acrylic Front Panels
Acrylic front panels may be molded and polished by a range of high-precision manufacturing processes, depending on size required, complexity of design, and optical performance specifications. The following are the most common processes used in professional production.
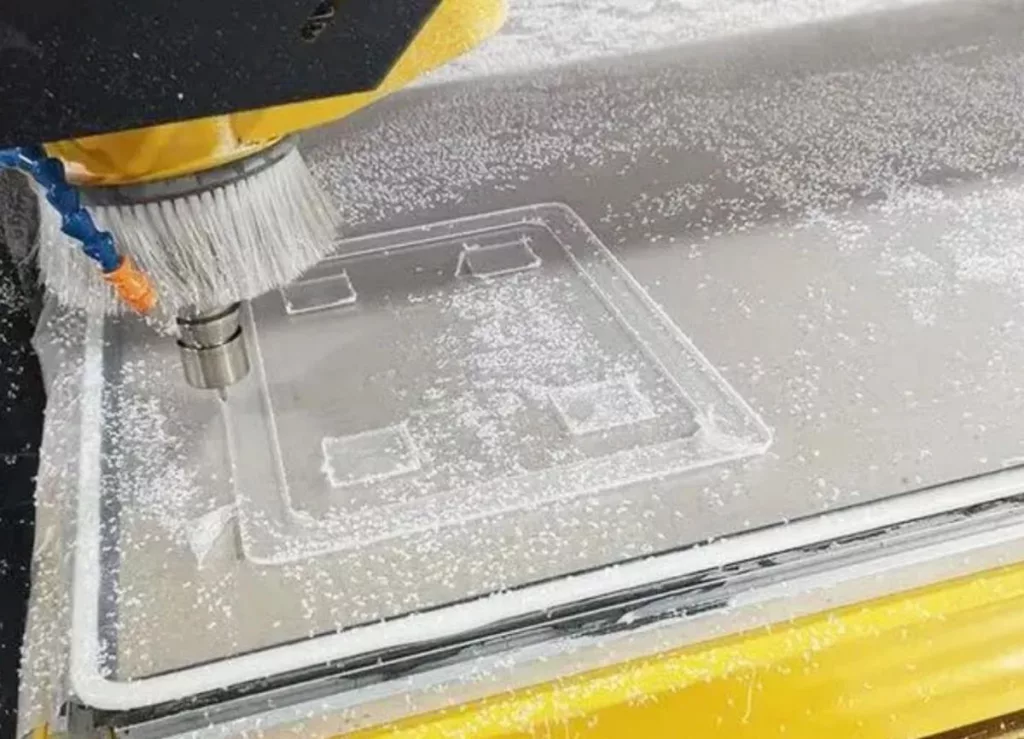
1. Cutting Technologies (Saw Cutting, Laser Cutting, CNC Knife Cutting)
Cutting defines the overall geometry and overall dimensionality of the panel.
- Saw Cutting – Best for easy rectangular shapes and mass production; it offers rapid throughput with minimal setup time.
- Laser Cutting – Provides extremely clean edge definition and smoothness with no requirement for post-polish. Best suited for complex contours and logo shapes.
- CNC Knife Cutting – Used for thin acrylic sheet cutting and prototype when thermal stress with lasers must be avoided. Provides clean, precise cuts with no edge coloring.
Proper cutting selection ensures minimal micro-cracks and thermal deformation, especially in optical-grade applications.
2. Drilling, Slotting, Edge Milling, and Chamfering
Secondary machining processes are subsequently utilized to perform mounting hole cutting, assembly interfaces, or aesthetic edges after cutting.
- Drilling – Low feed rate and sharp drill bits should be utilized to prevent chipping or cracking; holes should be deburred to maintain visual finish.
- Slotting / Milling – Facilitates grooves and recesses for LEDs, sensors, or switch fittings.
- Edge Milling & Chamfering – Adds safety and beauty with elimination of sharp edges. Polished chamfers tend to be used on high-end control panels.
Assembled with precise tolerance and professional finish.
3. Surface Decoration and Finishing
Front panels often serve as both functional and decorative elements. Several surface processes can be applied:
- Screen Printing (Silk Printing) – Creates long-lasting legends, scales, or logo marks with accurate color consistency.
- UV Printing – Well suited for high-resolution graphics or full-color identification, printed directly on the acrylic surface.
- Spray Coating / Painting – Gives a matte, glossy, or metallic finish with added abrasion resistance.
- Laser Engraving (Etching) – Marks, logos, or serial numbers with permanent high-accuracy, perfect for backlighted panels.
Multiple processes can be combined to produce both functional and aesthetic layering.
4. Bonding, Welding, and Lamination Assembly
Acrylic panels to be joined onto other structural parts or layered substrates can be joined in a variety of ways:
- Solvent Welding – Creates strong molecular bonds between acrylic surfaces for flawless joints.
- Adhesive Bonding – Employs UV-curable or optical-grade adhesives for transparent and stable adhesion to another material such as PC or PET.
- Mechanical Assembly – Employs fasteners, clips, or screw mounts for easy replacement or repair.
- Laminated Structures – Employ multiple layers (e.g., printed film + clear cover) for enhanced functionality, protection, and backlighting.
Accurate bonding ensures long-term stability and optical quality without warping or delamination.
5. Secondary Processing and Integration
Secondary processes add usability and personalization subsequent to the production of the basic structure:
- Laser Engraving or Micro-Texturing – Adds tactile feedback, branding templates, or anti-slip traction.
- Protective Film Application – Covers the surface during shipping or assembly to prevent scratches.
- Glass or Composite Lamination – Binds acrylic to tempered glass for maximum hardness and heat resistance in premium equipment.
These last processing steps enhance product performance and aid in meeting several industry standards in electronics, medical, or industrial control applications.
6. Design and Structural Integration of Acrylic Front Panels
Acrylic front panels are not only cosmetic components but also load-bearing components that are part of the finished product and must perform under load in mechanical assemblies. Effective design integration ensures reliability, precision, and stability over time.
1. Mounting and Fixing Methods (Screws, Clips, Joints, Clamps)
Front panels are mounted by various mechanical and adhesive methods depending on the product assembly:
- Screw Fixing – Offers strong, usable joints for industrial control panels and enclosures. Countersunk screws offer even surfaces.
- ap-Fit or Clip Mounting – Enables rapid tool-free assembly for use in consumer or modular products.
- Mortise and Tenon (Interlocking Joints) – Used in precision housings for stability as well as alignment.
- Clamping Plates or Frames – Secure the panel evenly, pressing against it to avoid warping or cracking.
Designers should ensure that fastening points are positioned to ensure balanced stress distribution and facilitate disassembly with ease when the product requires maintenance.
2. Thermal Expansion and Clearance Design
- Acrylic expands and shrinks with temperature changes more than glass or metals.
- Employ expansion gaps between panel and frame to resist cracking under thermal loading.
- Employ rubber spacers or flexible gaskets to absorb movement.
- In heavy panels, float mounting systems are ideal to avoid mechanical stress.
- Effective clearance design extends service life, especially in outdoor or high-temperature applications.
3. Sealing and Dust/Water Protection
- Environmental sealing is critical for outdoor equipment, instrumentation, and public interfaces.
- Seal edges and openings with EPDM or silicone gaskets to prevent dust or water infiltration.
- Form overlapping joints or elevated flanges in IP-rated constructs.
- Seal perimeter gaps or screw holes by using adhesive or UV-sealed tapes for full IP65/IP67 protection.
- Acrylic’s smooth finish also makes cleanup simple and prevents contamination build-up.
4. Anti-Vibration and Impact Resistance
- Mechanical impacts or vibrations may cause micro-cracks or delamination in acrylic assemblies.
- Mount shock-absorbing mounts or rubber pads between panel and frame.
- Increase panels or apply laminated acrylic-PC composites for high-impact situations.
- Employ rounded internal corners to spread the stress during vibration.
- These are essential for transportation, industrial, or outdoor applications.
5. Seam and Joint Treatment
- Visible seams affect both appearance and durability.
- Use optical-grade adhesives for transparent seams.
- Polish and chamfer exposed edges for smooth transitions.
- Apply masking or decorative trim to hide joint lines.
- For waterproof panels, offer overlapping joints with secondary sealants.
- A clean seam design enhances both mechanical integrity and visual appeal.
7. Front Panel vs. Cover vs. Window — What’s the Difference?
Although the front panel, cover, and window are synonymous terminology in product design, they are employed to define slightly different functional components. Establishing the distinction facilitates engineers and buyers to accurately name the component when designing and producing.
1. Front Panel
A front panel usually refers to the visible interface of an electronic device or machine, which combines both functional and decorative purposes. It may contain printed marks, cut-outs for controls, display holes, indicator LEDs, or touch-sensitive spots.
Acrylic, polycarbonate, or aluminum are generally utilized according to design and mechanical requirements. The front panel typically is a part of the enclosure and provides protection and user access at the same time.
2. Cover
A cover is a protective cover or enclosure designed mainly to shield internal components from impact, moisture, or dust. Compared to a front panel, a cover typically includes no printed legends or control openings; it’s interested in sealing and structural integrity.
Covers may be removable or hinged for maintenance access. In some designs, an acrylic front panel is mounted on a metal or plastic cover to achieve both protection and aesthetics.
3. Window
A window is an optically clear region or inset that gives visual access to interior indicators, sensors, or displays without exposing them to the ambient environment.
- Usually made of optically transparent acrylic or glass, windows are especially significant in equipment requiring optical clearness, for instance, instrument displays or sensor housings.
- They are usually inset within a front panel or cover rather than comprising the whole surface.
- High-performance demands include light transmission, anti-glare, and scratch resistance.
| Component | Primary Function | Typical Features | Common Materials |
| Front Panel | User interface + Aesthetic design | Cut-outs, print layers, logo, backlight area | Acrylic, PC, Aluminum |
| Cover | Protective enclosure | No markings, structural reinforcement | ABS, Metal, PC |
| Window | Optical transparency | Clear view area, anti-glare coating | Acrylic, Glass, PC |
Typically, the front panel is interaction and appearance, the cover protection and enclosure, and the window optical visibility. These three roles can overlap or be conflated in a composite structure according to the application in most industrial designs.
8. Performance Testing and Quality Control of Acrylic Front Panels
Acrylic front panels undergo optical, mechanical, and environmental specifications before they are shipped. Ongoing testing ensures long-term reliability and product uniformity.
1. Light Transmittance and Haze Testing
- Measure optical clarity using haze meters or spectrophotometers:
- Transmittance typically ranges from 90–92% for optical-grade acrylic.
- Haze values indicate the level of diffusion; low haze (<1%) is required for display windows.
- Testing ensures clear and accurate visual performance for screen or indicator visibility.
2. Impact and Breakage Resistance Testing
- Subject panels to drop-weight or pendulum impact tests in order to evaluate endurance.
- Test energy absorption without breaking or shattering.
- Test with mounting structures on crucial equipment in order to simulate real stress conditions.
- Impact testing validates the panel’s resistance to accidental knocks or abusive handling.
3. UV Aging, Oxidation, and Yellowing Tests
- Acrylic breaks down from long-term exposure to UV radiation.
- UV aging chambers simulate sunlight and weather outdoors.
- Track color shift (ΔE) and transmittance shift with time.
- Optically pure UV-stabilized acrylic maintains clarity 5–10 years outside.
- These tests validate material stability and optical life.
4. Scratch Resistance and Surface Hardness Evaluation
- Surface hardness is tested using pencil hardness or Taber abrasion methods.
- 3H–5H hardness hard-coated acrylic.
- Durability to cleaning and daily use will be determined through scratch testing.
- Surface quality is important for touchscreen or aesthetic applications.
5. Environmental Durability and Temperature Cycling Tests
- Test the panel’s ability to withstand humidity, thermal cycling, and chemicals:
- Exposed to -40°C to +80°C cycles to verify deformation and adhesion stability.
- Test chemical resistance to alcohol, cleaning chemicals, and oils.
- Ensures smooth operation under indoor and outdoor conditions.
6. Final Inspection and Factory Standards
Panels are checked for the following prior to shipping:
- Optical flatness (free of bubbles, haze, or flow lines)
- Dimensional tolerances (within ±0.1 mm tolerance)
- All manufacturers follow ISO 9001, ASTM D1003, and UL94 standards for uniform quality.
7. Defect Identification and Quality Statistics
Defects that occur commonly are:
- Edge cracking, uneven polishing, print misregistration, and surface contamination.
- Having a defect rate less than 1.5% is acceptable in industrial manufacturing.
- Continuous feedback and SPC (Statistical Process Control) enhance yield and reduce waste.
- Consistent performance and customer satisfaction are guaranteed through good quality control.
9. Maintenance of Acrylic Front Panels
Regular maintenance of acrylic front panels encourages their longevity and lasting beauty. The following are some of the practices in keeping them:
1) Cleaning
Gently wipe with soft, wet microfiber cloth or sponge. Abrasive cleaners and brushes with synthetics that scratch the finish are never used. Acrylic-friendly cleaning solutions or a diluted dish soap solution and water mixture can be used. Rinse thoroughly and dry with a soft cloth.
2) Polishing
For minor scratches, use professional acrylic polish or paste wax. Use on a soft cloth and buff in a light circular motion. For deep scratches, professional polish might be needed.
3) Handling
Panel handling should be done with gloved hands or clean hands to avoid fingerprints and oil spots. Panels are always to be handled by the edges to minimize direct contact with the surface.
4) Storage
To fix minor scratches, use a professional acrylic polish or paste wax. Use a soft cloth and buff in a circular motion to apply.
10. Troubleshooting of Acrylic Front Panels
Despite best practices, something can go wrong with acrylic front panels. Here are some steps to repair some of the more minor issues:
1) Scratch Removal
For surface scratches, employ an acrylic-safe polish or scratch remover. For deep scratches, fine-grit sandpaper (1500 grit or more) and polishing afterward will need to be done.
2) Yellowing over Time
If panels yellow, this may be a sign of exposure to UV. Use UV-resistant acrylic panels to address this problem.
3) Cracks and Chips
Minor edge chips can be sanded smooth. For cracks, solvent cement can be used to weld the crack. Extensive damage may necessitate a panel replacement.
4) Fogging or Haze
This may be caused by improper cleaning chemicals. Be sure to use only acrylic-safe cleaning chemicals. For continued fogging, professional cleaning may be necessary to regain clarity.
11. Material Cost and Economic Efficiency Analysis
Cost analysis is perhaps the most critical aspect when choosing materials for acrylic front panels. Knowing the material composition and processing cost assists manufacturers and purchasers in making better pricing and sourcing decisions.
1. Material Cost Composition
The total cost of an acrylic front panel consists of several major components:
Raw Material Cost: Acrylic sheets (PMMA) account for about 60–70% of the expense. Optical-quality and UV-resistant types are pricier due to purity and coating processes.
Surface Treatment and Printing: Decorative or functional coatings (anti-glare, hard coat, matte, or color print) add the overall cost by 10–20%, depending on the process complexity.
Cutting and Machining: Laser or CNC machining charges are typically 5–15% of the cost, varying with thickness, contour intricacy, and tolerances demanded.
Assembly and Mounting Accessories: Adhesives, screws, or sealing gaskets add 3–5%, while high-precision optical bonding (used for displays) can increase costs significantly.
Quality Assurance and Packaging: Inspection, protective film application, and specialized packaging might add an additional 3–8% according to export requirements.
Optical-quality acrylic panels tend to cost more for higher transparency, UV stability, and post-finishing requirements.
2. Processing Costs and Material Waste
Processing cost is determined by machining methods, yield rates, and operator efficiency:
Machining Waste: Typical cutting and trimming waste is 5–10%. Complex shapes or prototype runs can generate up to 20% loss due to offcuts.
Labor and Equipment Cost: Laser and CNC equipment have to be run proficiently; accuracy fabrication unit rates by the hour are $25–50/hour, depending on location.
Post-Processing and Polishing: Flame or mechanical polishing improves edge transparency but adds both time and material loss (up to 3–5%).
Maximized nesting and CNC software to reduce waste can significantly improve cost-effectiveness in high-volume production.
3. Cost Comparison: Acrylic vs. Glass vs. Polycarbonate (PC)
| Property | Acrylic (PMMA) | Polycarbonate (PC) | Glass |
| Material Price | Moderate | Higher (+30–50%) | Low |
| Weight | 50% lighter than glass | 40% lighter than glass | Heavy |
| Impact Resistance | 10× stronger than glass | 250× stronger than glass | Brittle |
| Optical Clarity | Excellent (92% transmittance) | Good (88%) | Excellent (91%) |
| UV Resistance | Excellent (with stabilizers) | Prone to yellowing | Excellent |
| Scratch Resistance | Moderate (requires coating) | Low (soft surface) | High |
| Processing Flexibility | High | High | Low |
| Cost Efficiency | Very good for decorative & general industrial use | Higher due to material & processing cost | Lowest cost but brittle & heavy |
- Acrylic (PMMA) offers the best combination of optical clarity, weight, and production cost — best for control panels, display, and indoor/outdoor equipment.
- Polycarbonate (PC) is more impact resistant but at a higher material and coating cost, best for ruggedized or safety-critical applications.
- Glass is still cost-effective for static non-impact use but is not flexible and incurs higher logistics risk with breakage.
12. How to Choose a Reliable Supplier or OEM Factory?
It is necessary to select an appropriate manufacturing partner in order to ensure stable quality, cost savings, and long-term partnership. The following criteria help you select a trustworthy acrylic front panel manufacturer or OEM factory.
1. Evaluate Production Capabilities
A qualified supplier should have complete and scalable production resources. Key aspects to verify include:
- Machinery & Facilities: Laser cutting machines, CNC routers, polishing lines, and screen/UV printing machines.
- Material Handling: Capability of processing optical-grade PMMA sheets and performing precision bonding or coating.
- Capacity & Lead Time: Is it possible to achieve consistent production for bulk orders without variations in quality?
On-site audits or video inspections are recommended to confirm actual capabilities.
2. Check Quality Control and Certifications
- Good factories possess strict quality systems and trackable test records.
- Ask if they operate based on ISO 9001 or ISO 14001 management systems.
- Request material certificates (RoHS, REACH, UL94) and optical test reports (haze, transmittance).
- Verify their incoming material inspection, in-process QC, and final inspection reports.
- An open documentation and test data supplier indicates good internal control.
3. Review Engineering and Customization Experience
- Technical know-how is required for OEM and ODM orders.
- Evaluate their CAD/CAM capability, mold design experience, and compatibility with other materials (e.g., PC, PET, metal).
- Verify if they can co-develop prototypes and alter tooling or print layers according to your functional specifications.
- Ask for past project samples—especially in similar industries such as control panels, medical devices, or consumer electronics.
- Companies with confirmed design collaboration experience will save your R&D cycle time and rework.
4. Assess Communication and Responsiveness
Global projects require effective communication.
- Check whether the supplier provides English-speaking project managers and clear documentation (drawings, QC reports, delivery notes).
- Monitor their turnaround time on emails or sample requests; lateness is typically a measure of bad internal coordination.
- Good partners have daily status reports and active problem reporting.
- Good communication prevents miscommunication and facilitates easier project management.
5. Analyze Cost Structure and Transparency
- There has to be open, itemized quotations by a reliable supplier with material cost, processing cost, and packaging cost.
- Avoid factories that give lump-sum figures only, not breakdowns.
- Negotiate tooling amortization, MOQ flexibility, and cost-savings options for ramp-up in volume.
- Open cost communication helps bring about long-term price stability.
Don’t forget: the lowest price is not always the most economical if quality or delivery reliability is compromised.
6. Review After-Sales Support and Warranty Policy
After shipment, scratches, yellowing, or crooked prints may happen.
- Verify if there are replacement or repair facilities for defective batches by the factory.
- Check warranty cover—typically 6–12 months for acrylic front panels in usual use.
- Reliable suppliers also maintain stock spare parts for repeat orders or field replacement.
- Excellent after-sales support reflects long-term involvement, not transactional manufacturing.
7. Consider Supply Chain Stability
- Acrylic sheet and coating material markets experience seasonally fluctuating demand.
- Choose suppliers with stable relationships with large PMMA brands (e.g., Mitsubishi, Lucite, Evonik).
- Examine their logistics and stock control partnerships for consistent delivery times.
- Factories with integrated sourcing systems can hedge against raw material shortage as well as price volatility.
- Your cost predictability and production continuity are influenced directly by supply chain resilience.
8. Conduct Small Batch Trials Before Mass Production
Before placing large orders, always perform a pilot production run to verify:
- Surface finish consistency
- Print alignment accuracy
- Optical clarity and bonding strength
- Packaging protection
This step minimizes risk and ensures that full-scale manufacturing meets your standards.
13. Acrylic Front Panel FAQs
Below are some frequently asked questions on acrylic front panels.
1) Are acrylic front panels environmentally friendly?
Acrylic panels can be recycled, a more environmentally friendly option than most plastics. Acrylic recycling plants are available in most regions.
2) Can acrylic panels be cut to special sizes?
Acrylic panels can be precisely cut, drilled, and formed to special orders. Custom fabrication is easily available.
3) How are acrylic panels different from polycarbonate panels?
Acrylic panels are mistier and scratch-resistant than polycarbonate. Polycarbonate panels are more resistant to impact and fire, though.The choice is made dependent on the application requirements.
4) Can acrylic panels be used outside?
Yes, if the acrylic is UV-resistant, it can remain outdoors with no measurable deterioration of quality. Make sure the particular acrylic used is intended for use outdoors.
5) For how long does an acrylic front panel remain?
Acrylic front panels will last numerous years if properly maintained. The lifetime will depend on the environment, exposure conditions, and maintenance practices.
14. Conclusion
Acrylic front panels provide a stunning, durable, and extremely versatile solution to numerous types of applications. With their optical clarity and light composition, ease of engraving, and more, such panels have emerged as the industry standard in selection for numerous industries.
While they are resilient in the areas of scratch resistance and heat expansion, good maintenance and proper use can successfully counteract such liabilities. By understanding the types, advantages, disadvantages, how to care for them, and uses of acrylic front panels, you can make an informed decision based on your own needs.

Leave A Comment